Testing Ceph RBD Performance with Virtualization
Table of Contents
This post explains how I measured Ceph RBD performance with block/network virtualization technology (virtio and vhost), and the result.
VM execution is done through qemu-system-x86_64, without using libvirt.
- Host: Fedora 33 (Linux kernel 5.10.19)
- Guest: Ubuntu 20.04 LTS Server (Linux kernel 5.4.0.67)
# Qemu general configuration
qemu-system-x86_64 --machine q35,accel=kvm, --enable-kvm \
    -m 2048 -smp 2 -cpu host \
    -vnc :0 \
    -hda disk.qcow2 \
    <append configuration-specific options>
Performance is measured with fio running on the guest VM with the following configuration file:
# Latency measurement
[global]
bs=4K
iodepth=1
direct=1
group_reporting
time_based
runtime=120
numjobs=1
name=latencytest
rw=randrw
rwmixread=90

# Throughput measurement
[global]
bs=4K
iodepth=64
direct=1
group_reporting
time_base
runtime=120
numjobs=1
name=throughputtest
rw=randrw
rwmixread=90
Access through network #
A VM can access a Ceph RBD via its network. virtio-net and vhost-net can be used to virtualize guest network.
In this case, fio running on the VM can be tested in two ways such like a normal Ceph client uses:
- via
librbd:fioprovidesrbdioengine, which useslibrbd.[rbdtest] ioengine=rbd clientname=admin pool=rbd rbdname=test - via
krbd: mount a rbd image to a device/dev/rbd0on the guest operating system, and uselibaioasfio’s ioengine.[krbdtest] ioengine=libaio filename=/dev/rbd0
1.1. virtio-net #
With virtio-net, a guest VM directly accesses a Ceph RBD image via network.
<qemu general configuration>
-netdev type=user,id=net0 \
-device virtio-net-pci,netdev=net0,mac=<mac>
Note that
-netdevoption can be replaced with-nic:-nic user,model=virtio-net-pci,mac=<mac>. Refer to this.Just for reference,
-netdevand-nicare more modern ways than-netcommand line option.
1.2. vhost-net #
To use vhost-net, the host kernel should be built with CONFIG_VHOST_NET enabled.
$ lsmod | grep vhost
vhost_net 32768 1
tun 57344 3 vhost_net
tap 28672 1 vhost_net
vhost 57344 2 vhost_net
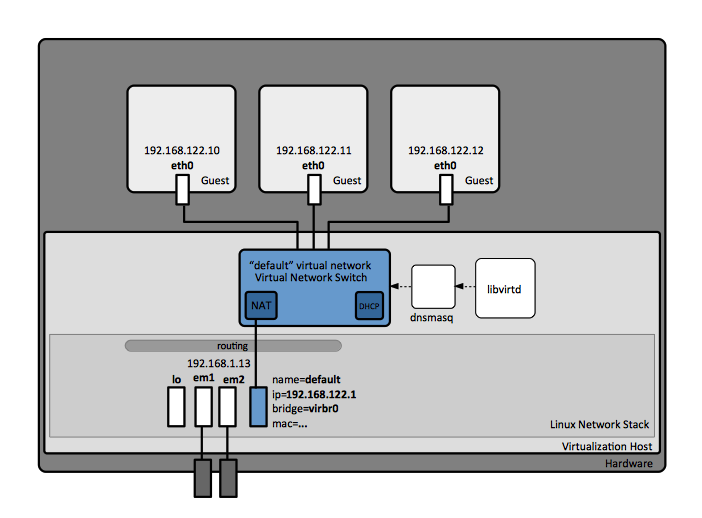
We at first create a bridge to connect tap device to network. I will use NAT networking to provide network to a guest VM, as described below:
It can be created with brctl, however, it has been deprecated and recommended to use ip instead 1.
$ ip link add br0 type bridge
$ ip addr add 192.168.122.1/24 broadcast 192.168.122.255 dev br0
$ ip link set br0 up
Then, create a script named qemu-ifup that can be used by QEMU to attach a tap device that will be created to the bridge:
#!/bin/sh
set -x
switch=br0
if [ -n "$1" ]; then
ip tuntap add $1 mode tap
ip link set $1 up
sleep 0.5s
ip link set $1 master $switch
exit 0
else
echo "Error: no interface specified"
exit 1
fi
Then, it is now ready to run a VM:
<qemu general configuration>
-netdev type=tap,id=net0,vhost=on,script=/path/to/qemu-ifup \
-device virtio-net-pci,netdev=net0,mac=<mac>
You can check whether vhost-net is used or not 2. On the host terminal, type:
$ ip -d tuntap
tap0: tap one_queue vnet_hdr
Attached to processes:qemu-system-x86(6919)
A VM then cannot access to the network due to lack of DHCP feature. Either use dnsmasq, or manual IP assignment is required.
Using dnsmasq is well explained in here 3, and static IP assignment is also explained in here 4. I will follow the latter, with an additional works to be done.
I wanted to make a virtual network with subnet 192.168.122.0/24, so that I added 192.168.122.1 address to the bridge. Following it, change a guest VM’s network configuration. Note that, Ubuntu 20.04 manages its network configuration with netplan utility, so some legacy ways such as using systemd-resolved or /etc/networking no longer work. Instead, modify a configuration file in /etc/netplan/00-installer-config.yaml:
network:
ethernets:
enp0s2:
dhcp4: true
version: 2
to
network:
ethernets:
enp0s2:
addresses: [192.168.122.100/24]
gateway4: 192.168.122.1
nameservers:
addresses: [8.8.8.8]
version:
which means, it has a static IP 192.168.122.100 and use the bridge in the host as its gateway.
After modifying it, apply it with:
$ sudo netplan apply
$ ip addr
...
2: enp0s2 : ...
link/ether ....
inet 192.168.11.1200/24 brd 192.168.122.255 scope global enp0s2
...
$ ip route
default via 192.168.122.1 dev enp0s2 proto static
192.168.122.0/24 dev enp0s2 proto kernel scope link src 192.168.122.100
Access through block device #
When QEMU mounts a rbd image via librbd to the VM, then a VM can access a Ceph RBD via the device. virtio-blk and vhost-scsi can be used.
In this case, fio running on the VM can be tested with krbd only:
[krbdtest]
ioengine=libaio
filename=/dev/rbd0
2.1. virtio-blk #
With virtio-blk, QEMU uses librbd to mount rbd image to VM device /dev/vda.
<qemu general configuration>
-drive format=rbd,id=rbd0,file=rbd:rbd/test,if=none,cache=directsync \
-device virtio-blk-pci,drive=rbd0,id=virtioblk0
Note that cache option can vary, and refer to this for more options. Here I used
directsyncto measure latency correctly, otherwise it uses kernel cache and write performance is shown incorrectly.
2.2. vhost-scsi #
To use vhost-scsi, you need vhost-scsi kernel module enabled.
$ lsmod | grep vhost
vhost_scsi             45056  5
vhost                  57344  1 vhost_scsi
target_core_mod       417792  14 target_core_file,target_core_iblock,iscsi_target_mod,vhost_scsi,target_core_pscsi,target_core_user
Your QEMU configuration should be like 5 6:
<qemu general configuration>
-device vhost-scsi-pci,wwpn=naa.number,event_idx=off
vhost moves context switch between host user space and host kernel space, which means a Ceph RBD image must also be mounted to the host kernel via krbd:
$ rbd map test -p rbd
/dev/rbd0
Now create a SCSI LUN (Logical Unit Number):
$ sudo targetcli
targetcli shell version 2.1.53
Copyright 2011-2013 by Datera, Inc and others.
For help on commands, type 'help'.

/> backstores/block create name=rbd0 dev=/dev/rbd0
Created block storage object rbd0 using /dev/rbd0.
/> /vhost create
Created target naa.5001405b3bafbfbd.
Created TPG 1.
/> /vhost/naa.5001405b3bafbfbd/tpg1/luns create /backstores/block/rbd0
Created LUN 0.
/> ls
o- / ......................................................................................................... [...]
  o- backstores .............................................................................................. [...]
  | o- block .................................................................................. [Storage Objects: 1]
  | | o- rbd0 ........................................................... [/dev/rbd0 (20.0GiB) write-thru activated]
  | |   o- alua ................................................................................... [ALUA Groups: 1]
  | |     o- default_tg_pt_gp ....................................................... [ALUA state: Active/optimized]
  | o- fileio ................................................................................. [Storage Objects: 0]
  | o- pscsi .................................................................................. [Storage Objects: 0]
  | o- ramdisk ................................................................................ [Storage Objects: 0]
  o- iscsi ............................................................................................ [Targets: 0]
  o- loopback ......................................................................................... [Targets: 0]
  o- vhost ............................................................................................ [Targets: 1]
    o- naa.5001405b3bafbfbd .............................................................................. [TPGs: 1]
      o- tpg1 .................................................................. [naa.5001405f58d02fbc, no-gen-acls]
        o- acls .......................................................................................... [ACLs: 0]
        o- luns .......................................................................................... [LUNs: 1]
          o- lun0 ...................................................... [block/rbd0 (/dev/rbd0) (default_tg_pt_gp)]
In this case, naa.5001405b3bafbfbd is a wwn. Put it in the QEMU configuration value for the key wwpn (BTW, what these acronyms stand for? I don’t know).
When you use scsi for your VM, the disk is shown as /dev/sda, not /dev/rbd0.